Zebrafish Embryo Tools
Normalize the orientation of the images of the Zebrafish embryos, find the point of injection of tumor cells and measure the distribution of Cy3 stained tumor foci.
For the time being only the normalization is implemented. You can find example images here: B2.tif, B3.tif, B6.tif, B10.tif.
The implementation is inspired by the protocol described in:- Ghotra VPS, He S, de Bont H, van der Ent W, Spaink HP, van de Water B, et al.
Automated Whole Animal Bio-Imaging Assay for Human Cancer Dissemination.
Rénia L, editor. PLoS ONE. 2012 Feb 8;7(2):e31281.
Getting started
To install the tools, drag the link Zebrafish_Embryo_Tools.ijm to the ImageJ launcher window, save it under macros/toolsets in the ImageJ installation and restart ImageJ.

- the first button (the one with the image) opens this help page
- the n button normalizes the angle and orientation of the zebrafish in the current image
- the b button starts a batch processing of the normalization on a folder containing the input images
Normalization
The normalization will turn the zebrafish and orient it in a way that the fish is parallel to the horizontal axis looking to the right. The input images should either be one channel images or hyperstacks containing the different channels.
It works the following way:
Normalization of the angle:- If necessary convert the hyperstack to an rgb image
- Convert the rgb image to 8-bit. This will combine the different channels to one 8-bit image.
- Apply a mean filter to smooth the image.
- Apply a mean-threshold.
- Use the particle analyzer to remove small objects.
- Apply close and fill holes commands to get a smooth, connected outline
- Use the particle analyzer to remove small objects (up to 10 times the size in step 5).
- Create a selection from the mask.
- Measure the angle with the help of the "fit ellipse" measurements.
- Rotate the original image by the measured angle.
- Create a selection of the zebrafish and transfer it to the original image as above.
- Calculate the center of mass and the centeroid of the zebrafish.
- If the center of mass is left of the centeroid, flip the image horizontally.
- From the left end of the zebrafish calculate the points x_s that is at 75% of the length
- Find the position y_s that at x_s is halfway between the upper and the lower border of the zebrafish
- Measure the intensity in a rectangle in the upper half and in the lower half at x_s
- If the intensity in the upper half if bigger than in the lower half, flip the zebrafish vertically
Options
A right click on the n-button opens the parameter dialog.
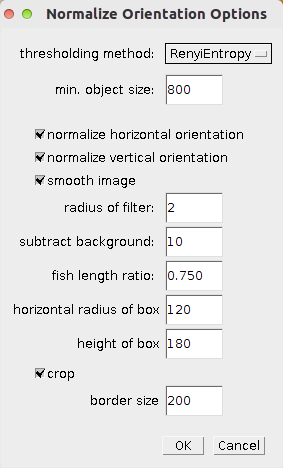
- thresholding method - the auto-threshold method used to create the mask and the selection of the zebrafish
- min object size - objects smaller than this size are removed from the mask and after some operations to connect the pixels in the mask, objects smaller than ten times this size are removed.
- normalize horizontal orientation - allows to skip the normalization of the horizontal orientation
- normalize vertical orientation - allows to skip the normalization of the vertical orientation
- smooth image - if selected the image is smoothed with a mean filter before the segmentation of the zebrafish is done
- radius of filter - the radius of the mean filter
- subtract background - a fixed value that is subtracted from the 8-bit version of the image when doing the segmentation
- fish length ratio - the ratio of the fish length from tail end of the embryo at which the yolk sac is located
- horizontal radius of box - half of the horizontal diameter of the rectangle used to determine the vertical orientation
- height of box - the height of the rectangle used to determine the vertical orientation
- crop - when checked the image is cropped to the bounding box of the segmented zebrafish plus a given border size
- border size - size of the border that is kept around the zebrafish when the image is cropped
Results
 |
 |
Batch Processing
When pressing the b-button a dialog is opened that allows the user to select the input folder containing the images. Par default the tif-images in this folder are treated and the results are written to a subfolder "normalized". The image file extension and the name of the output folder can be changed in the options (right-click on the b-button).