Root Tools
The root tools help to efficiently measure the following characteristics of plant roots:
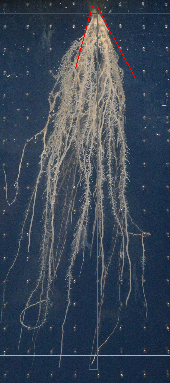
- the angle of the opening of the whole root
- the depth to which it goes down
- the number of roots at multiple depths (for example 30cm, 35cm, ...)
- the diameters of the roots at multiple depths (for example 30cm, 35cm, ...)
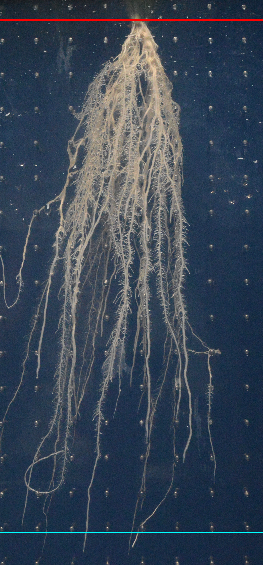
An example image can be found here: DSC_0605.JPG.
Getting started
To install the tool, drag the link root_tools.txt to the ImageJ launcher window, save it under macros/toolsets in the ImageJ installation and restart ImageJ.
Select the "root_tools" toolset from the >> button of the ImageJ launcher.

- the first button (the one with the image) opens this help page
- the s-button sets the spacial scale of the image (make a line selection corresponding to the known distance before pressing the button)
- the r-button sets the start point of the root, i.e. the point where the green of the plant ends and the root begins)
- the a-button measures the angle of the opening of the root
- the d-button measures the maximum depth to which the root goes down
- the z-button creates a zoomed copy of the region around a point that allows to measure the diameter of the root at that place
- the m-button measures the diameter of a root
- the w-button writes the measured features to a results table and saves a control image
Automatically adjusting and turning images when opened

A right-click on the first button (the one with the image) allows to activate or deactivate the auto-run commands that are executed when an image is opened. Note that this option is kept between toolset changes ImageJ restarts. When the option is activated, the images are turned 90° left and the contrast is automatically adjusted. You can select the commands you want to be executed and deselect those you do not want to be executed. By holding down shift while selecting the toolset you can open the source code and modify the content of the variable ON_IMAGE_OPEN_COMMANDS if you need other commands to be executed. Save the toolset and re-select it to activate your changes.
Setting the scale [f5]
If you select auto-set scale the scale will be set automatically from the width of the rhizobox (20cm) when you press f5 or the s-button.
Otherwise select a distance of 4cm in the image, using ImageJ's line selection tool. Press the s-button. You will see that the dimensions of the image are now displayed in cm at the top of the image window. You can change the known distance used to set the scale in the options. To open the options dialog right-click on the s-button. Note that the changed value will be used until you change the current toolset or restart ImageJ. After that the default value will be used again. You can change the default value permanently by changing the constant at the beginning of the macro-file. In order to do this, hold down shift and select the toolset. This will open the source code of the macro. Change the value of the constant KNOWN_DISTANCE and save the changed macro from the menu File>Save. The change will be active after you re-selected the toolset from the toolset button (>>).
If all images in a series have the same spacial scale, select "use global scale". It is than enough to set the scale for the first image. The same scale will be applied to all following images in the working session.
Define root point
Press the r-button. Now search the point at which the green of the plant ends and the root begins. You can use the F1 and F2 keys to zoom into and out off the image. When zooming the image will be centered to the mouse position. Left click to set the root point. A red line will be drawn at the height of the root point. A line is drawn at the defined depth (30cm) for the over-next step.
In the options of the tool that you can open with a right-click on the r-button, you can change the display parameters and the depth for the line at which you want to measure the number and diameters of crossing roots.
Angle
Create two lines that intersect the baseline and add each two the roi manager (t). Than press the a-button to measure the angle. The defining the angles will be drawn into the image.
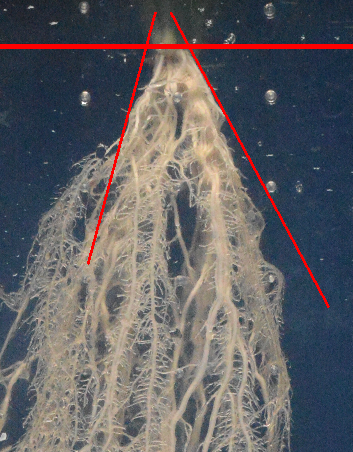
Right click on the a-button to change the display options.
Measure Depth
Press the z-button. Use F1 and F2 to navigate to the point of the root that is the deepest in the image. Remember that the image is centered at the mouse position when you zoom. Click on the point. A vertical line from the root point to the depth and a horizontal line to the point you clicked will be drawn on the image.
Zoom region
Press the z-button. Note that if you use the tools in the defined order the right tool will automatically be selected for you. Use F1 and F2 to navigate to the first crossing of a root with the cyan-colored line. Click on the crossing point. A zoomed area around the point will be displayed in a new window. The line selection tool will be active? Use it to draw a line across the diameter of the root (vertically to the local growth direction).
 |
 |
Measure diameter
After you selected the diameter with the line selection tool press the m-button. This will close the zoom window and draw a yellow line across the diameter onto the overlay of the original image.

Repeat the steps "Zoom region" and "Measure diameter" for all roots that cross the cyan coloured line.
Write report
Once you added all diameters of roots crossing the 30cm line, press the w-button to write the measurements to a results table. A control image will be saved to the subfolder control of the folder containing the input image. The overlay will be removed from the current opened image. You can use File>Open Next (ctrl+shift+o) to open the next image in the folder and repeat the same procedure. At the end the measurements for the second image will be added to the existing results table.

Publication using the tools
- Burrell, T., Fozard, S., Holroyd, G.H., French, A.P., Pound, M.P., Bigley, C.J., James Taylor, C., and Forde, B.G. (2017). The Microphenotron: a robotic miniaturized plant phenotyping platform with diverse applications in chemical biology. Plant Methods 13.
- - Rodriguez-Furlán, C., Miranda, G., Reggiardo, M., Hicks, G.R., and Norambuena, L. (2016). High throughput selection of novel plant growth regulators: Assessing the translatability of small bioactive molecules from Arabidopsis to crops. Plant Science 245, 50–60.