Crop 4D Cells¶
The Crop 4D Cells Tool allows to separate the selection of cells in 4D images from the actual export as an image of each cell. The export that can take some time for large images is done in batch mode after the user interactively specified the regions of interest. Only one cell at a time needs to fit into the memory of the computer. Input images can be in all formats supported by Bio-Formats. Results are written as ics image files. You can use hela-cells.tif and mitosis.tif as example images.
Getting Started¶
Install the "Macro_IO_Settings plugin". Download the file iosettings.zip and unzip the archive file in the plugins folder of your ImageJ installation. Drag the link Crop_4D_Cells.txt to the ImageJ launcher window, save it under macros/toolsets in the ImageJ installation and restart ImageJ.
You must have the Bio-Formats plugin installed. Check if you find Bio-Formats in the menu Plugins. If it is not installed, download the file bioformats_package.jar from the Bio-Formats download page. Save it into the plugins folder of your ImageJ.
Select the "Crop_4D_Cells" toolset from the >> button of the ImageJ launcher.

- ? opens this help page
- |< skip to the first image
- < go one image back
- > go one image forward
- >| skip to the last image
- *§* reload the current image
- A add a roi containing a cell to be exported on the current image
- E export the defined cells each as an image in ics format
Options¶
Right-click on one of the blue navigation buttons (|<, <, >, >|, §) to open the IO Settings dialog. Make sure the file list tab is selected. Press the add... button and in the file-dialog select the images you want to process. Note that you might have to select All Files in the field Files of Type in order to see all image types. The selected images will now be shown in the list editor. You can modify the list by adding more images or deleting images. Once done press the close button.
Now switch to the output folder tab. Press the add button and in the file-dialog select the output folder into which the results of the processing will be written.
 |
 |
Right-click on the E button to open the options for the batch processing.
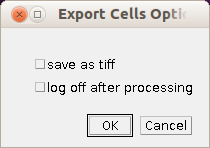
- If you check save as tiff the result images will be saved in the tiff format of ImageJ.
- If you check log off after processing your session will be closed after the processing finished.
Selecting and cropping cells¶
Start by pressing the Reload Image button, the one with the label §* or press *F6. The first image in the list will be loaded. Select the first cell with the rectangular selection tool from ImageJ and press the A button or press the F7 key. This will add the selection to the roi-manager and save the selections for this image to the disk. Continue with the next cell. Once done go to the next image by using the > button or F4.
Once all cells in all images are selected close all image windows and press the E button. The processing will begin and the progress will be reported in a log-window.
